How-To Guides
A Step by Step instruction guide for all of the services and features we offer
Take your banking experience to a new level when you take advantage of the features and services we offer
Your banking experience shouldn't be confusing or frustrating. We offer a robust suite of convenient banking services and features, but just because it is available to you, doesn't always mean it is easy to figure out. With the help of this step-by-step guide, we take you through the process of enrolling and utilizing all of the things that will make banking with Centreville a breeze.
If you have questions about any of these services or features, head into one of our local branches or call our Customer Contact Center at 800.377.4424 between the hours of 7:00AM and 7:00PM Monday – Friday and 9:00AM to 1:00PM on Saturday and they will be happy to assist you.
Frequently Asked Questions
This FAQ is meant to provide some quick answers about what to expect with our contactless cards mass re-issue.
Contactless Debit Cards
What are contactless Cards?
Contactless Cards are the newest way to pay at the register. Contactless cards are equipped with new secure technology that allows you to make payments without inserting your card at payment terminals.
How do contactless payments work?
Contactless transactions are made by simply TAPPING your contactless chip card on a contactless payment terminal or holding your card near the contactless-enabled reader. This is also known as “tap to pay.” If you have payment-enabled mobile or wearable devices, such as digital wallet enabled on your smartphone or smartwatch, you can also tap to pay with your devices. Contactless checkout is secure, convenient, and touch-free.
Why hasn't the card image in mobile wallet updated?
Currently our card image in the mobile wallet will remain as is until early 2023.
Will Centreville Bank ITMs take contactless cards?
Our ITMs will have to be upgraded to accept contactless transactions, this project is scheduled for 2023.
Will I need to update my Automatic Payments?
YES. You must notify merchants of your new card number details.
Will my uChoose points transfer?
YES. The transfer was completed in January.
What happens if I need a new card now?
You are able to receive an instant issue Debit Card in any one of our branches.
Thank you for banking at Centreville Bank. We are grateful for the opportunity and look forward to serving you in the future. For additional information, please feel free to call our Contact Center at (401)-821-9100 or visit one of our branches.
How To Enroll In E-Statements
As primary owner of the account(s), you must also consent to receive eStatements within Online or Mobile Banking to complete the enrollment. Your consent is necessary to stop ongoing delivery of future paper statements and avoid any associated monthly fee related to their receipt.
The process to confirm your enrollment in eStatements and can completed within Online or Mobile Banking.
Please note that once enrollment is complete, all future statements and account notices will be delivered through the eDocuments tab in Online and Mobile Banking. The change will be applied to all accounts for which you are the primary account owner.
How to complete your e-statement enrollment:
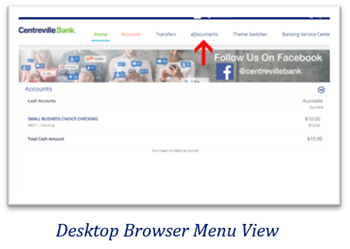
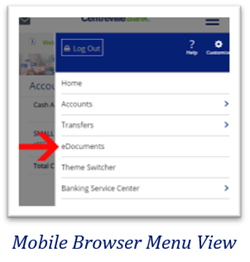
1. Login to Online or Mobile Banking and select “eDocuments” from the main menu.
2. Click on the link and review the “eDocument Enrollment Disclosure.”
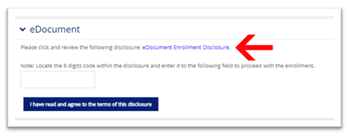
3. Enter the 6-digit code found in the eDocument Enrollment Disclosure into the box and click “I have read and agree to the terms of this disclosure.” Enrollment will then be complete.
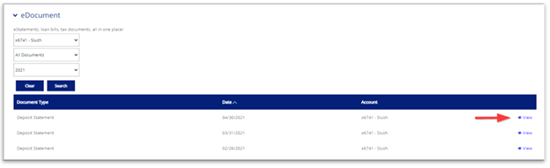
How to Download Your eDocuments
(statements, bills and notices)
1. Login to Online or Mobile Banking and select “eDocuments” from the main menu.


2. Click Search to view all available documents for the current year. Or, choose your Account, Document, and Year from the dropdown selections and click Search.
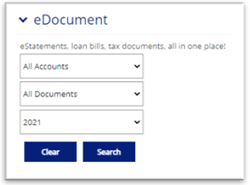
3.Click View beside the desired document.
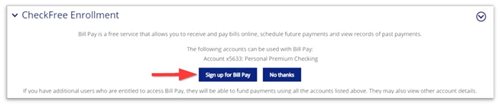
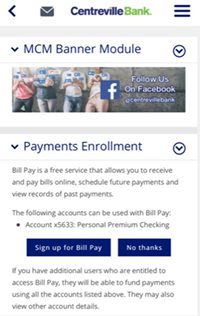
How To Set Up Bill Pay
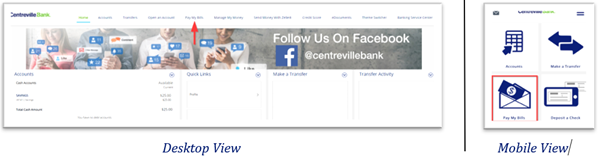
1. Login to Online or Mobile Banking and select “Pay My Bills” from the main menu.
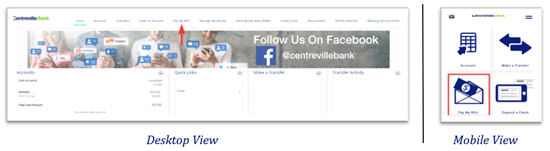
2. Select “Sign up for Bill Pay”.
 Desktop View
 Mobile View
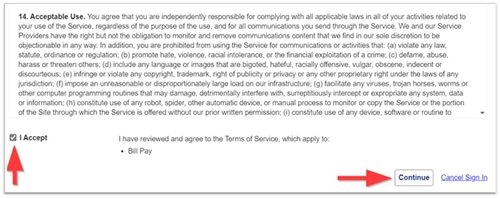
3. Read and Accept the Bill Pay disclosure and select “Continue”.
4. See How to Set Up Bill Pay Payees and Make a Payment
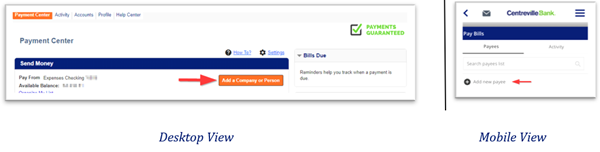
How to Set Up Bill Pay Payees and Make a Payment
1. Login to Online or Mobile Banking and select “Pay My Bills” from the main menu.
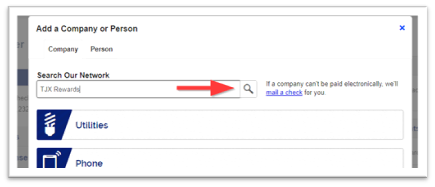
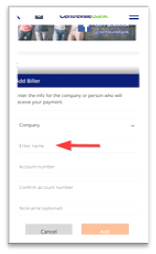
2. Desktop: Select “Add a Company or Person” | Mobile: Select “Add new payee”
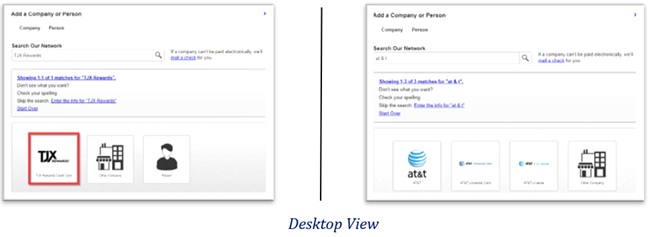
3a. Desktop: Type the name of the company (as it appears on your billing statement) in the Search box and click the magnifying glass.
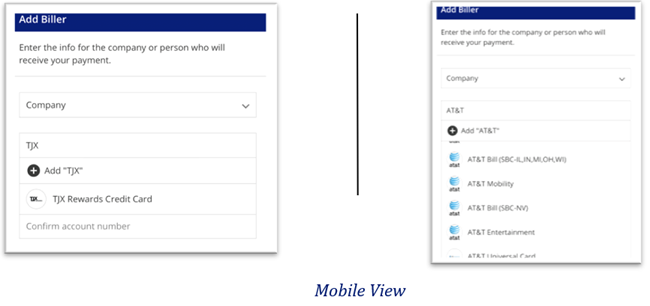
3b. Mobile: Type the name of the company (as it appears on your billing statement) in the “Enter name” field. The system will automatically search after you’ve typed three characters.
4. Choose the desired payee from the results. TIP: Be sure to choose the correct payee if there are multiple results.
5. Enter the full account number in the Account Number fields and select “Add”.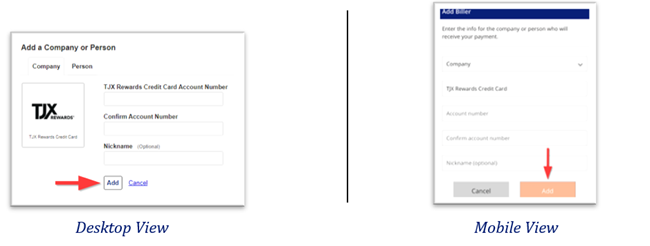
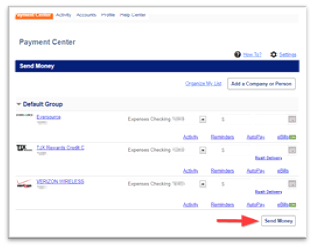
6a. Desktop: Choose Pay From account (if you have more than one checking); enter Amount; choose Deliver By date (will default to next available); select “Send Money”.
6b. Mobile: Select a payee from your list; choose Pay From account (if you have more than one checking); enter Amount; choose Deliver By date (will default to next available); select “Pay”.

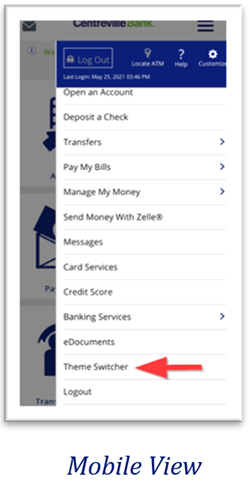
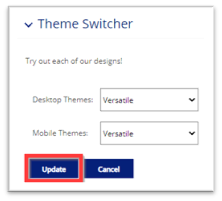
Choose Your Online Or Mobile Theme
1. Login to Online or Mobile Banking and select “Theme Switcher” from the main menu. Tip: Mobile users may need to scroll down in the menu to see the option.
2. Choose your desired theme for Desktop and/or Mobile and Select “Update”.
How To Set Up Alerts
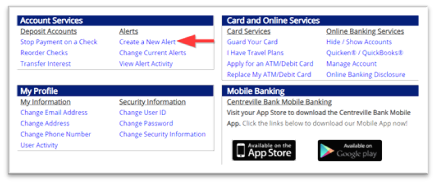
1a. Desktop: Login to Online Banking and select “Banking Service Center” from the main menu.
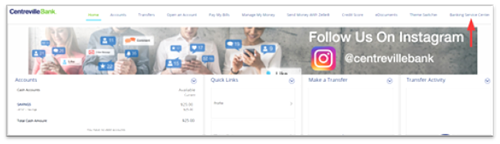
In the Banking Service Center select “Create a New Alert”.
1b. Mobile: Login to Mobile Banking and select “Banking Services” > “Manage My Alerts” > “My Alerts” from the main menu.
2. To see a list of available alerts, select “Click here for more detailed information about the Alerts we offer.”

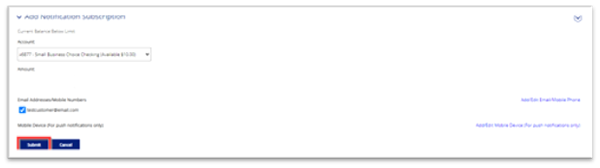
3. Choose your desired alert and select “Add Subscription”.

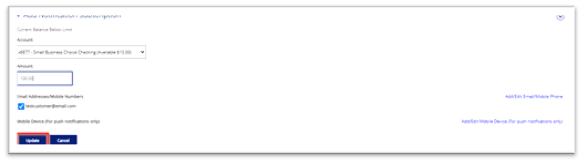
4. Choose the desired Account, enter all other applicable information, Add/Edit Email/Mobile Phone if you wish to use one other than the one currently checked, and Select “Submit”
5. To edit an alert:
a. Desktop: select the pencil image beside the desired alert.

b. Mobile: select the desired alert.
6. Change preferred information and select “Update”.
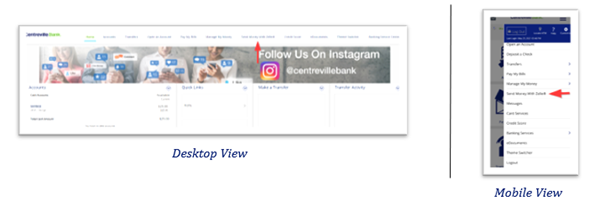
How to Enroll in Zelle® and Send Money
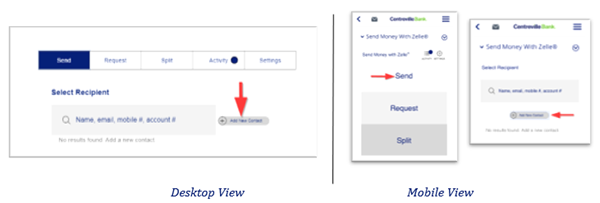
- Login to Online or Mobile Banking and select “Send Money With Zelle®” from the main
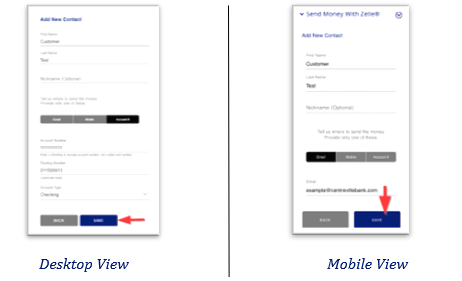
- Select “Send”, then “Add New Contact”.
- Enter the “Contact” name and one of the following: Email, Mobile, or Account #, and select “Save”.
- Enter the Amount, choose your Send Date (and Frequency if desired), choose your From My Account, and select “Review”.
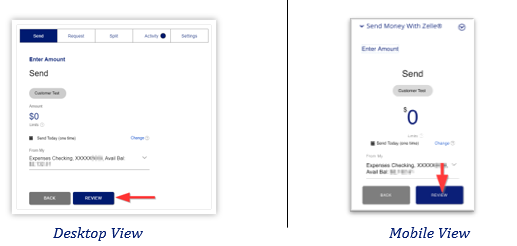
- Review the transaction and select “Send”.

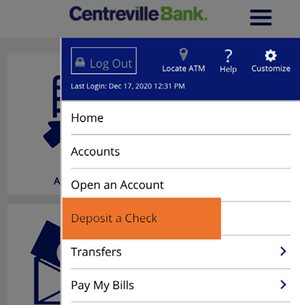
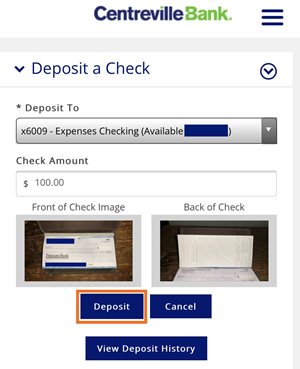
How To Deposit A Check With Your Phone
- Open the CB Mobile app.
Visit your device app store and search Centreville Bank to download the Mobile app.
- Choose Deposit a Check from the main menu at the top right, or tap if displayed as a tile on the home screen.
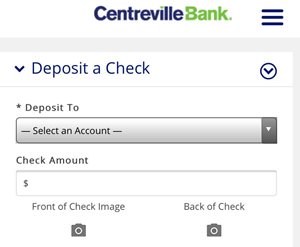
- Select an Account, and enter the amount of the check being deposited.
- Take photos of check using the prompts from the app. Photos are automatically taken once the check is in position. There are prompts and tips to help when taking the images.
Check Image prompt:
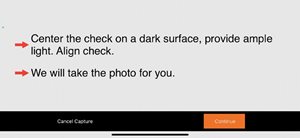
If auto capture fails, user will get choices (Cancel, Retry, and Manual). If manual is selected, a button appears to tap and take the picture.

Check Image success notification will appear when image of check is captured successfully.

- Tap the deposit button to complete your transaction.
How To Set Up Biometric Login In The Mobile App
- Open the CB Mobile app.
Visit your device app store and search Centreville Bank to download the Mobile app.
- Choose Banking Services from the main menu at the top right.
- Tap Manage Fingerprint/FaceID.
- Tap Fingerprint/Face ID Enrollment.
- Enter the device name, your username and password.
- Choose which option you prefer to login with.
- Once your Fingerprint or Face ID is set up you can manage the login through banking services as well.
How to use the Banking Services Center
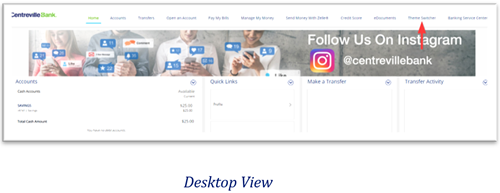
The Banking Services Center in Online and Mobile Banking has a number of convenient services to make your banking experience as easy and efficient as possible.
You can find the Banking Services Section in the navigation at the top of the page in Online Banking, and in the Hamburger Menu on the Mobile Banking App.
Desktop
 Mobile App
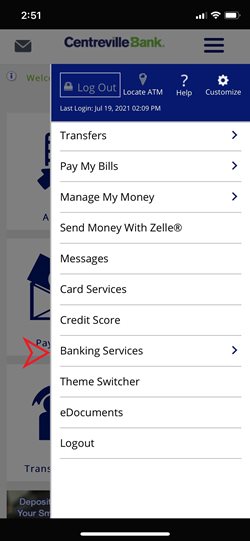
The services you will find are:
- Manage Alerts
- Manage Fingerprint/Face ID
- Guard My Card
- Manage Account Nicknames
- Stop Payments
- Stop Payment History
- Hide-Show Accounts
- Report Lost/Stolen Card
- Travel Notifications
- My Profile
- Manage Fast Balances
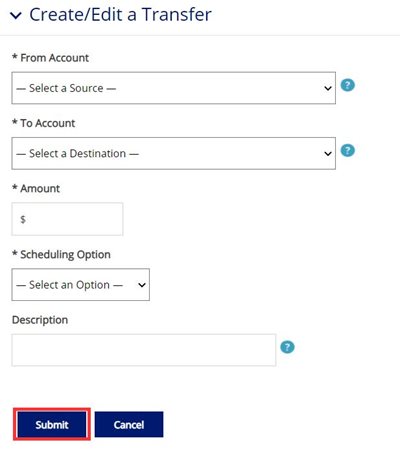
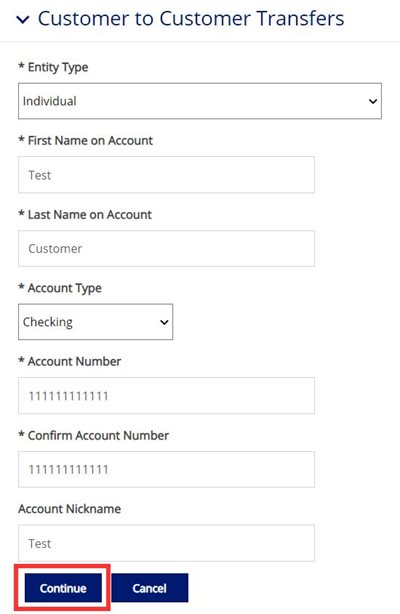
How to Set Up Person to Person (Unlinked) Account Transfers
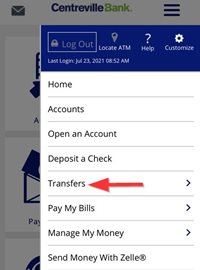
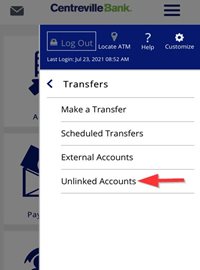
1. Login to Online Banking or the Mobile App.
- Desktop Version: Click on "Transfers" in the menu bar, and then select "Customer to Customer" from the drop down menu.

- Mobile App: Select "Transfers" from the menu, and then select "Unlinked Accounts".
2. Enter all required information and select “Continue”. Note: you will need the full account number and full name as it appears on the account. Once the account is added you then have the option to transfer to (only) the account.
3. Choose your From/Source Account, your new Person to Person/Unlinked Account, enter the amount, choose the scheduling option (recurring available if needed), and select Submit.